

Sashing Your Quilt Blocks Together to Form Your Quilt Centre
Cutting Instruction
-
Cut 6 pieces of 4 inch strips
-
Cut 6 pieces of 2.5 inch strips.
From these strips, cut 8 pieces of 12.25 inch strips + 3 pieces of 39.75 inch strips.
-
Cut 8 pieces of 17/8 inch x 12.25 inch strips
Cut 3 pieces of 17/8 inch x 40 inch strips
The measurements for the Spacer Strips and Sashers are to suit my blocks, which I had cut down to 12.25 inch.
If your block are bigger or smaller you will need to accommodate this.
Making the Sashes
-
With the raw edges facing up, use a prong pin to secure the end of the strip to the ironing board, one prong either side of the centre. This helps to prevent stretching and keeping the strip aligned.
-
Place the side of the hot steam iron against the curve of the sasher.
-
Push the Sasher along slowly with the iron, while using your fingers to keep strip aligned.
Step 5
Press up to around 12 inches at a time and then move your work along the ironing board and reposition your prong pin. Press all of the strips.
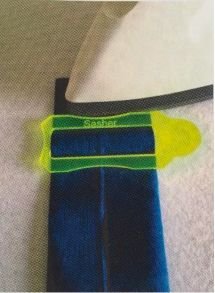
Step 1
Using your 2 inch sasher tool, take 1 strip of Fabric 1. Lay your strip right sides down on your ironing board. Fold sides of strip to meet in the centre and press the first inch of the strip with a steam iron.
Weave folded fabric strip over the middle bar of the sasher tool.

-
Place sashing right sides down, open out the folded side and insert 1 of the 1 7/8 inch x 12.25 inch strips of wadding.
Fold edges back over the wadding the press well, ensuring that the edges on the back of your sashing are meeting in the middle.
Repeat this process 7 more times.
-
Take the other 3 remaining Fabric 1 sashers and cut back to 3 pieces of 39.75 inch strips and repeat the process of inserting
the wadding.
Making Spacer Strips
-
Take one of (Fabric 9) 12.25 inch x 2.5 inch spacer strip and add it to the back of the right hand side of block 1 ensuring that the right sides of the backing are together.
Pin and stitch to block using a 0.25 inch seam.
-
Attach the other side of the spacer strip to the left hand side of block 2, once again ensuring that the right sides of the backing are together.
Pin and stitch using a 0.25 seam. Iron it nice and flat.
-
Turn over and now it is time to attach the sashing to the front of the work.
Using Roxanne Glue Baste It, run a small line of glue along the inside of the seam allowance of block 1 and place your sashing just covering the edge of the sewn seam line. Iron to set glue.
To attach the other side of the sashing to block 2, run a line of glue along the inside of the seam allowance of block 2.
The side of the sash should be just covering the sewn seam line. Iron to set glue.
Now stitch both side of the sashing with monopoly thread on top of the machine and bobbin.
-
Add Block 3 to this Line 1 using the same process.
-
Sew Lines 2, 3 and 4 using the same process, and you will end up with 4 lines of 3 blocks.
Spacer Strips are the backing fabric for the sashing that attach the back of your quilt together. You need to consult the front cover of the pattern to get the blocks places correctly.
When sewing your block together and using this method, I do one sash at a time. I don’t put the whole quilt or line together all at once. I join block 1 to block 2 backing, and then turn over and put sashing between block 1 and block 2. I then move onto joining Block 3 onto this Block 1 and 2, backing first and then the sashing between block 2 and block 3.
Quilt your Sashing
When quilting my sashing, I marked the fabric with an X.
I measured out the sashing between blocks and divided it by 6.
It doesn’t have to be the accurate one to one measurement, but try to get the crosses about the same size and that they match up at the intersections between blocks and lines.
Sew the four lines together to form the quilt center.
Important Note
After attaching the spacer strip to the back, and you are getting ready to attach the sashing to the front, it is really important that your vertical sashing strips are all running down in a row.
For example, when attaching line 1 to line 2 – after attaching the spacer strip on the back – on the front of the work – butt line 1 up to line 2 and see it the vertical lines line up. You may have to fudge a bit to make them line up.
-
Sew 39.75 inch spacer strip between line 1 and 2 using the same process as above.
-
Using the 2 inch sashing filled with the wadding, attach to the front of the work as per process above.